Tech, Art, and Things

author-icon

New Shop!

@jjk 10/13/2026

This site now has a shop.

It's part garage sale and part workshop table. Some of what's listed is stuff I own and no longer need. The rest is things I make. Everything is a physical object that I pack and send myself, so most listings are one of a kind: when it sells, it's gone.

How it works

  • Add things to your cart and check out. Payment goes through Stripe, so your card details never touch this site.
  • Shipping is to US addresses, priced by the weight of your order. The cart shows the cost before you pay.
  • If you're in the Denver area, you can choose local pickup and skip shipping.
  • Items in your cart aren't reserved until you start checkout. After that they're held for you for 30 minutes.

More is coming

The shelves are thin right now. I'm photographing and listing more over the next few weeks, so check back.

For the curious

I built the shop myself, on the same Django code that runs this blog. Products sync both ways with Stripe, stock is tracked here, and photos are converted and hosted the same way as described in a previous post.

For a long time, adding an image to a post here meant uploading it somewhere else, copying a URL and hoping it stayed alive. So I built a proper media pipeline into the site. It turned out to be a nice little tour of Django, S3, Celery and ffmpeg, so here's how it works.

Step 1: Just write markdown

Posts are markdown, so media should be too. Every upload gets a short name, and the post points at it with a made-up media: scheme:

![My cat judging me](media:grumpy-cat)

![Build timelapse](media:timelapse){.autoplay .loop .muted width=480}

![Conference talk](youtube:dQw4w9WgXcQ)

The renderer, markdown-it-py, spots media: and swaps in the right <img>, <video> or <audio> tag. The {...} options come from the attrs plugin, but with a twist: nothing in the braces reaches the HTML directly. Every attribute is set aside, and the renderer picks out the few it knows about:

renderer = MarkdownIt("default", {"html": False}).use(
    attrs_plugin, after=("image",), allowed=()
)

allowed=() means "keep everything aside for me", and html: False means no raw HTML sneaks through either. Markdown is lovely, but it's not a place to type onerror=.

Step 2: Trust the bytes, not the name

A file called cute.jpg might really be a PNG, a video, or something that shouldn't be there at all. So uploads are identified by their contents: magic bytes for PDFs and ZIPs, Pillow for images, and ffprobe for everything else.

FILE_SIGNATURES = {
    b"%PDF-": ("application/pdf", ".pdf"),
    b"PK\x03\x04": ("application/zip", ".zip"),
}

The file name the browser sent never decides anything. Stored files get a random name inside the article's folder:

def article_media_path(instance, filename):
    extension = Path(filename).suffix.lower()
    return f"blog/{instance.article_id}/{uuid.uuid4().hex}{extension}"

Step 3: Make it browser-friendly (in the background)

Once the upload is committed, a Celery task takes over. on_commit matters here: without it, the worker can go looking for a row the database hasn't saved yet.

transaction.on_commit(lambda: process_media.delay(pk))

The task does whatever the file needs:

  • Photos get resized WebP copies at 640, 1280 and 1920 pixels wide, served with srcset. The original is never served. A nice side effect: re-encoding drops EXIF data, so no GPS coordinates of my kitchen end up online.
  • MP4s that browsers can already play just get remuxed with +faststart, so they start playing before they've fully downloaded. No quality lost.
  • Everything else (MOV from a phone, MKV, odd audio) is transcoded to H.264/AAC, and videos get a generated poster frame.
ffmpeg(
    "-i", source,
    "-c:v", "libx264", "-crf", "23", "-pix_fmt", "yuv420p",
    "-c:a", "aac", "-b:a", "160k",
    "-movflags", "+faststart",
    target,
)

The result goes into a status field (pending → processing → ready or failed, with an error message), so the admin always shows what happened.

There's one race I had to handle: what if I replace a file while the old one is still being processed? The task only saves its result if the file is still the one it started with:

updated = ArticleMedia.objects.filter(pk=media.pk, file=original_name).update(**fields)
if not updated:
    delete_stored_files(saved)  # we lost the race; clean up our leftovers

Step 4: Big files skip the server entirely

Small files go through a normal Django form. But a 3 GB video would tie up a web worker for ages and run into every proxy body limit on the way. So the admin's drag-and-drop uploader asks Django for a presigned PUT URL, and the browser sends the file straight to the bucket:

url = client.generate_presigned_url(
    "put_object", Params=params, ExpiresIn=60 * 60, HttpMethod="PUT"
)

Once the upload finishes, the browser tells Django, which registers the file and queues processing. Django checks that the key it's told about is one it could have generated for that article, so the browser can't register any random object in the bucket.

Step 5: Serving it (and caching forever)

Rendered posts are cached for a week, so media URLs must never expire. That rules out signed URLs, so media lives in its own public bucket with random names and year-long immutable cache headers.

The render cache key includes a fingerprint of every media item in the post, so editing alt text or re-processing a video naturally gives a fresh render. There's no "clear cache" button to forget to press.

In front of the bucket sits Cloudflare, which caches everything at the edge and blocks other sites from hotlinking. The bucket itself only answers requests that carry a secret only Cloudflare knows, so going around the CDN gets you nothing.

Step 6: Clean up after yourself

Replace or delete a media item and its old files (the original, the WebP copies, the poster) are deleted from the bucket. That happens after the transaction commits, so a rolled-back save doesn't delete files that are still in use.

Was it worth it?

Absolutely. Adding a video to a post is now drag, drop, and type media:. The rest happens on its own. And every time a 40 MB phone photo turns into a 90 KB WebP, I feel a little glow of satisfaction.

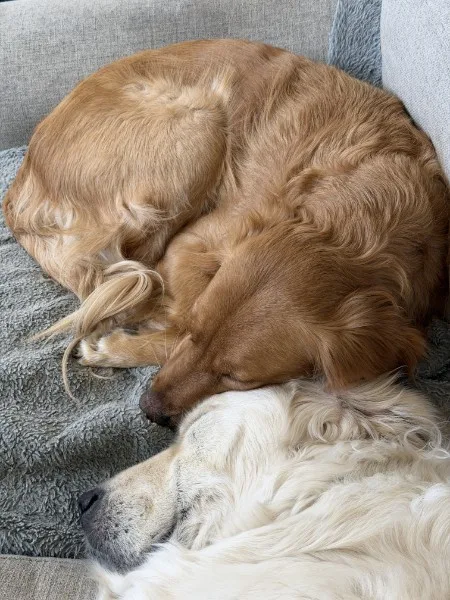
Now I can share this picture of my dogs My pups
Introduction

I needed a straightforward way to encrypt a database dump file for archival purposes—something simple, effective, and with minimal dependencies. After exploring various options, I settled on this method.

Prerequisites

  • OpenSSL 3.0.5 5 Jul 2022 (Library: OpenSSL 3.0.5 5 Jul 2022)
  • xxd 2024-09-15 by Juergen Weigert et al.

Generate RSA Key Pair

Note this step only needs to happen once. Unless you have any reason to keep different private keys around for different reasons.

For this method of encryption we'll want to create a RSA Key Pair just like you would for SSH access. You will want to store the private key somewhere secure and we will be using the public key encrypt the AES key and AES IV files in a later step.

# Generate the private key
openssl genpkey -algorithm RSA -out private_key.pem -pkeyopt rsa_keygen_bits:4096 -aes-256

# Extract the public key from the private key
openssl rsa -pubout -in private_key.pem -out public_key.pem

Encryption with AES & RSA

0. Setup

If you are following along you can replace the UNENCRYPTED_FILE variable with a file you want to try encrypting. The rest of the commands in this tutorial will be using these variables.

Copy and paste the following variables into your terminal.

UNENCRYPTED_FILE=MY_FILE.PNG
ENCRYPTED_FILE=${UNENCRYPTED_FILE}.enc
PUB_KEY=public_key.pem
AES_KEY=aes.key
AES_IV=aes.iv
AES_BIN=aes.bin
AES_ENC=aes.bin.enc

1. Generate a AES Key and AES IV file

We will be using the following files to do symmetrical encryption.

openssl rand -out ${AES_KEY} 32   # 32 bytes = 256-bit AES key
openssl rand -out ${AES_IV} 16    # 16 bytes = IV for AES-256-CBC

cat $AES_KEY $AES_IV > ${AES_BIN}

Explainer

AES Key
  • This is the secret key used to encrypt and decrypt the data.
  • AES-256 requires a 256-bit (32-byte) key, which must be securely stored.
AES IV
  • The Initialization Vector (IV) is a random value that ensures each encryption operation produces different ciphertexts, even if encrypting the same plaintext with the same key.
  • The IV is required when using CBC mode (-aes-256-cbc), as it helps prevent pattern recognition attacks.

2. Encrypt the large file with the AES key

We use openssl's enc commandto encrypt the target file with aes-256-cbc

openssl enc -aes-256-cbc -salt -in {UNENCRYPTED_FILE} -out ${ENCRYPTED_FILE} -pass file:${AES_KEY} -pbkdf2 -iter 10000 -iv $(cat ${AES_IV}$ | xxd -p)

Explainer

  • -salt: This ensures that a unique cryptographic salt is used for each encryption operation. The salt is a random value added to the encryption key derivation process to prevent precomputed attacks (e.g., rainbow table attacks). It makes sure that even if the same plaintext is encrypted multiple times with the same password, the resulting ciphertext will be different.

  • -iter 10000: This specifies the number of iterations used in the key derivation function (PBKDF2 in this case). By increasing the iteration count, you make brute-force attacks more difficult because it forces the attacker to perform many computations for each password guess. A higher iteration count increases security but also increases encryption and decryption time.

  • -pass file:${AES_KEY} option. OpenSSL derives the actual encryption key from this file, especially if -pbkdf2 and -iter are used.

  • $(cat ${AES_IV} | xxd -p) reads the IV file and converts it to a hexadecimal format suitable for OpenSSL.

You can use a different iter value but the decryption step will have to match.

3. Encrypt the AES Key and IV

After we encrypt the file, we will want to encrypt our AES key and AES IV file with the RSA public key. This ensures that the file encryption keys are also encrypted but recoverable with the private RSA key.

openssl pkeyutl -encrypt -inkey ${PUB_KEY} -pubin -in ${AES_BIN} -out ${AES_ENC} -pkeyopt rsa_padding_mode:oaep

4. Cleanup

After the encryption process is done, we will want to remove the intermediate AES key and the AES file and the combined file that we created earlier. If these files are left around and discovered they can be used to decrypt your encrypted file without the use of the private RSA key.

rm $AES_KEY $AES_IV $AES_BIN

5. Moving the files around

At this point we should have the ENCRYPTED_FILE and the AES_ENC file. These files should be stored together or separately (for more security):

UNENCRYPTED_FILE=MY_FILE.PNG
ENCRYPTED_FILE=${UNENCRYPTED_FILE}.enc
AES_ENC=aes.bin.enc

Script

The following bash script does the above steps and will combine the ENCRYPTED_FILE and AES_ENC file into a single file for easier transport and storage. I found for my purposes that this is "Secure Enough".

#!/bin/bash

set -e

# Default behavior: remove the original file 
KEEP_ORIGINAL=false 

# Parse the optional -k flag 
if [ "$1" == "-k" ]; then 
    KEEP_ORIGINAL=true
    shift # Remove the flag from the arguments list
fi

# Check if arguments are passed
if [ "$#" -ne 2 ]; then
    echo "Usage: $0 <public_key.pem> <file_to_encrypt>";
    exit 1;
fi

PUB_KEY=$1
UNENCRYPTED_FILE=$2
TEMP_ENCRYPTED_FILE=${UNENCRYPTED_FILE}.tmp.enc
ENCRYPTED_FILE=${UNENCRYPTED_FILE}.enc

AES_FILE_NAME=aes
AES_KEY=${UNENCRYPTED_FILE}.${AES_FILE_NAME}.key
AES_IV=${UNENCRYPTED_FILE}.${AES_FILE_NAME}.iv
AES_BIN=${UNENCRYPTED_FILE}.${AES_FILE_NAME}.bin
AES_ENC=${UNENCRYPTED_FILE}.${AES_FILE_NAME}.enc

cleanup() {
    rm -f $AES_KEY $AES_IV $AES_BIN $AES_ENC $TEMP_ENCRYPTED_FILE
    echo -e "\n[✔] Temp files removed..."
}
trap cleanup EXIT

openssl rand -out ${AES_KEY} 32 && \
    openssl rand -out ${AES_IV} 16

echo "[✔] Generated AES Key and IV."

cat $AES_KEY $AES_IV > ${AES_BIN}
echo "[✔] AES Key and IV successfully packaged"

openssl enc \
    -aes-256-cbc \
    -salt \
    -in ${UNENCRYPTED_FILE} \
    -out ${TEMP_ENCRYPTED_FILE} \
    -pass file:${AES_KEY} \
    -pbkdf2 \
    -iter 10000 \
    -iv $(cat ${AES_IV} | xxd -p)
echo "[✔] File encrypted successfully using AES-256-CBC."
    
openssl pkeyutl \
    -encrypt \
    -inkey ${PUB_KEY} \
    -pubin \
    -in ${AES_BIN} \
    -out ${AES_ENC} \
    -pkeyopt rsa_padding_mode:oaep
echo "[✔] Encrypted ${AES_BIN}"

cat $AES_BIN $TEMP_ENCRYPTED_FILE > $ENCRYPTED_FILE

if [ "$KEEP_ORIGINAL" = false ]; then
    rm "$UNENCRYPTED_FILE"
    echo "[✔] Original file removed."
else
    echo "[✔] Original file kept."
fi

echo -e "\nResulting Files:"
echo -e "\tEncrypted File:\t${ENCRYPTED_FILE}"

Decrypt with AES & RSA

We do it all in reverse

0. Setup

UNENCRYPTED_FILE=MY_FILE.PNG
UNENCRYPTED_FILE=${ENCRYPTED_FILE%.enc}
PRIVATE_KEY=private_key.pem
AES_KEY=aes.key
AES_IV=aes.iv
AES_BIN=aes.bin
AES_ENC=aes.bin.enc

1. Decrypt the AES key with the private RSA key

This step will decrypt the AES_ENC file into the AES_BIN file.

openssl pkeyutl -decrypt -inkey ${PRIVATE_KEY} -in ${AES_ENC} -out ${AES_BIN} -pkeyopt rsa_padding_mode:oaep

2. Extract the AES Key and IV

We will then extract the AES Key and AES IV file from the AES_BIN file

head -c 32 ${AES_BIN} > ${AES_KEY}  # Extract AES Key
tail -c 16 ${AES_BIN} > ${AES_IV}   # Extract IV

3. Decrypt the file

We then use the AES_KEY and AES_IV files to decrypt the ENCRYPTED_FILE

openssl enc -aes-256-cbc -d -salt -in ${ENCRYPTED_FILE} -out ${UNENCRYPTED_FILE} -pass file:${AES_KEY} -pbkdf2 -iter 10000 -iv $(cat ${AES_IV} | xxd -p)

Script

Similar to above, this script also does the bonus step of extracted the AES_ENC file from the combined file before decrypting the AES key and AES IV file.

#!/bin/bash

set -e

# Default behavior: remove the original file 
KEEP_ORIGINAL=false 

# Parse the optional -k flag 
if [ "$1" == "-k" ]; then 
    KEEP_ORIGINAL=true
    shift # Remove the flag from the arguments list
fi

# Check if arguments are passed
if [ "$#" -ne 2 ]; then
    echo "Usage: $0 <private_key.pem> <file_to_decrypt>";
    exit 1;
fi

PRIVATE_KEY=$1
ENCRYPTED_FILE=$2
TEMP_ENCRYPTED_FILE=${ENCRYPTED_FILE}.tmp.enc
UNENCRYPTED_FILE=${ENCRYPTED_FILE%.enc}

AES_FILE_NAME=aes
AES_ENC=${UNENCRYPTED_FILE}.${AES_FILE_NAME}.enc
AES_BIN=${UNENCRYPTED_FILE}.${AES_FILE_NAME}.bin
AES_KEY=${UNENCRYPTED_FILE}.${AES_FILE_NAME}.key
AES_IV=${UNENCRYPTED_FILE}.${AES_FILE_NAME}.iv

cleanup() {
    rm -f $AES_KEY $AES_IV $AES_BIN $TEMP_ENCRYPTED_FILE
    echo -e "\n[✔] Temp files removed..."
}
trap cleanup EXIT

echo "---Enter pass phrase for $PRIVATE_KEY:"
read -s RSA_PASS
echo $RSA_PASS

# Determine RSA key size from private key (in bytes) 
RSA_KEY_SIZE=$(openssl rsa -in "$PRIVATE_KEY" -text -noout -passin pass:"$RSA_PASS" | sed -n -E 's/.*\(([0-9]+) bit.*/\1/p')
echo "[✔] Discovered RSA Key Size: $RSA_KEY_SIZE"
if [ -z "$RSA_KEY_SIZE" ]; then
    echo "Error: Unable to determine RSA key size."
    exit 1
fi

# Extract the encrypted AES key and IV (first RSA_KEY_SIZE bytes) 
head -c $RSA_KEY_SIZE $ENCRYPTED_FILE > $AES_ENC
echo "[✔] ${AES_BIN} successfully extracted"
tail -c +$((RSA_KEY_SIZE + 1)) $ENCRYPTED_FILE > $TEMP_ENCRYPTED_FILE
echo "[✔] ${TEMP_ENCRYPTED_FILE} successfully extraced"

openssl pkeyutl \
    -decrypt \
    -inkey ${PRIVATE_KEY} \
    -in ${AES_ENC} \
    -out ${AES_BIN} \
    -pkeyopt rsa_padding_mode:oaep \
    -passin env:RSA_PASS
echo "[✔] ${AES_BIN} successfully decrypted"

# Extract AES Key & Extract IV
head -c 32 ${AES_BIN} > ${AES_KEY} && \
    tail -c 16 ${AES_BIN} > ${AES_IV}
echo "[✔] AES Key and IV successfully unpackaged"

openssl enc \
    -aes-256-cbc \
    -d \
    -salt \
    -in ${ENCRYPTED_FILE} \
    -out ${UNENCRYPTED_FILE} \
    -pass file:${AES_KEY} \
    -pbkdf2 \
    -iter 10000 \
    -iv $(cat ${AES_IV} | xxd -p)
echo "[✔] File successfully decrypted using AES-256-CBC."

if [ "$KEEP_ORIGINAL" = false ]; then
    rm $ENCRYPTED_FILE
    rm $AES_ENC
    echo "[✔] Encrypted file removed."
else
    echo "[✔] Encrypted file kept."
fi

echo -e "\nResulting Files:"
echo -e "\tDecrypted File:\t${UNENCRYPTED_FILE}"

Questions

Why can't we just encrypt with the RSA key?

RSA asymmetrical encryption has a limit to the file size that it can encrypt. This limit is directly in relation to the RSA key size. Generating an extremely large RSA key comes with performance hits and would still not encompass extremely large files. For example, we would easily exceed the limit with database dumps. Instead, we side step this by generating a key that can be encrypted with RSA and subsequently using AES to encrypt the large file with that key.